I have a Nortek USB stick and it is not creating a mesh network for zigbee. I have 4 devices connected by they will not mesh
3 posts - 3 participants
I have a Nortek USB stick and it is not creating a mesh network for zigbee. I have 4 devices connected by they will not mesh
3 posts - 3 participants
Hi All,
Could you help me, I would like to customize a simple wall mounted button (with a smart relay), that
Hardwares and circuits are ok, but the programming in HA doesn’t work. I have tried If-Then blocks and Numeric state, but nothing.
Can you give me any idea? 
Thanks
2 posts - 2 participants
Hello,
I’m trying for the first time to create a button-card in order to open a shutter cover.
For me it is enough that if I tap once on button card, it needs to open the cover.
So the code of the button-card is the following, with its options:
type: custom:button-card
        entity: cover.tapparella_della_camera
        tap_action:
          action: call-service
          service: apertura_tapparella_camera
        aspect_ratio: 1/0.5
        color_type: card
        color: rgb(65, 109, 150)
        state:
          - operator: template
            value: |
              [[[
                if (entity.attributes.current_position === 100
                    && entity.state == 'opening'
                )
                return 'open';
              ]]]
            icon: mdi:transfer-up
            name: IN APERTURA
            color: rgba(255,193,7, 0.8)
          - operator: template
            value: |
              [[[
                if (entity.attributes.current_position === 100
                )
                return 'open';
              ]]]
            icon: mdi:window-shutter-open
            name: APERTA
            color: rgb(65, 109, 150)
          - operator: template
            value: |
              [[[
                if (entity.attributes.current_position > 0
                && entity.attributes.current_position < 100
                && entity.state == 'open'
                )
                return 'open';
              ]]]
            icon: mdi:arrow-up
            name: APRI
            color: rgb(65, 109, 150)
          - value: closed
            icon: mdi:arrow-up
            name: APRI
            color: rgb(65, 109, 150)
          - value: opening
            icon: mdi:transfer-up
            name: IN APERTURA
            color: rgba(255,193,7, 0.8)
          - value: closing
            icon: mdi:arrow-up
            name: APRI
            color: rgb(100,100,100)
Then I created a script called “apertura_tapparella_camera” (sorry for my italian, in english means “open_cover_shutter”  ) following the gui procedure and in the end into scripts.yaml it creates the following code:
apertura_tapparella_camera:
  alias: apertura_tapparella_camera
  sequence:
  - sequence:
    - service: cover.open_cover
      metadata: {}
      data: {}
      target:
        device_id: 3350479f4adc13950a2f62e1bf01c179
  description: ''
But now, if I tap on the button-card, it gets the error:
service invokation apertura_tapparella_camera/undefined failed. required key not provided @ data[‘service’]. Got None
Which is the part I miss to get it work?
1 post - 1 participant
Hi I’ve some trouble with an automation, any suggestions are welcome.
I need to be informed when this sensor triggers to a new value but the issue is that it first becomes unavailable for a moment.
Beside this, I want to know its value BEFORE it becomes unavailable, but that’s where I’m struggling because I can’t use trigger.from_state then.
alias: test
description: ""
trigger:
  - platform: state
    entity_id:
      - sensor.mysensor
condition:
  - condition: template
    value_template: "{{ trigger.from_state.state not in ['unknown'] }}"
  - condition: template
    value_template: "{{ trigger.from_state.state != trigger.to_state.state}}"
  - condition: template
    value_template: "{{ states('sensor.mysensor') | is_number }}"
  - condition: template
    value_template: "{{ trigger.to_state.state not in ['unknown', 'unavailable'] }}"
action:
  - service: notify.myself
    data:
      message: >-
        {{ trigger.to_state.name }} goes from {{ trigger.from_state.state }}x to {{ trigger.to_state.state }}x.
      title: change update
mode: single
3 posts - 2 participants
Good day,
I would like to start using the bootstrap-grid-card and I have made a small test dashboard.
Can you give me a clue how to get a space between bottom-down of card 2 and bottom-top of card 3?
type: custom:bootstrap-grid-card
class: container-fluid
use_hass_style_clutter: false
hass_style_gutter_size: 5px
container_padding: 5px
global_row_class: container-fluid
cards:
  - type: row
    cards:
      - type: custom:button-card
        class: col-sm-6
        name: 1
        styles:
          card:
            - background-color: green
            - height: 100px
      - type: custom:bootstrap-grid-card
        class: null
        use_hass_style_clutter: false
        hass_style_gutter_size: 0px
        container_padding: 0px
        cards:
          - type: row
            cards:
              - type: custom:button-card
                class: col-md12
                name: 2
                styles:
                  card:
                    - background-color: blue
                    - height: 50px
              - type: custom:button-card
                class: col-md-12
                name: 3
                styles:
                  card:
                    - background-color: red
                    - height: 50px
  - type: row
    cards:
      - type: custom:button-card
        entity: null
        name: 4
        styles:
          card:
            - background-color: grey
            - height: 50px
2 posts - 2 participants
I currently run Home assistant via Kubernetes, i am not sure how do i need to add openwakeword support honestly, i tried running a container on the same pod exposing 10400:tcp but its not detected, i then tried opening that as a cluster ip resource or even a node port but still no luck, can this be configured manually somewhere to tell HA where the openwakeword container is listening? I cannot install the addon so i am stuck (the OWW integration is not detected in the voice assistant settings)
1 post - 1 participant
I have several Yi cameras hacked with yi-hack-v5.
I would like some advice on which integration should work best with them: Yi camera, Generic camera, ONVIF, WebRTC…
Thanks in advance.
1 post - 1 participant
I haven’t done much weather-related automation, but now I want to automate my lawnmower robot to adjust its schedule based on the probability of precipitation.
So first I want to get a rainfall forecast at midnight for the next 24 hours. Later I’ll figure out how to use this to select the best time to mow, but for now I just want to display the probability for the next 24 hours as a graph on my dashboard.
I know how to use the weather.get_forecasts service to extract probabilities for the next 24 hours, but how can I use this data to create a graph? I know I could create a template sensor for each hour that contains that probability as a state, but I don’t see how I could use that to create the graph I want.
Is this even possible without custom integration/frontend cards?
1 post - 1 participant
Hi all,
I would like to ask you for help with sentence and intent script configuration because I am little bit lost in documentation not able to find what I need.
I have a script for turning my climate on in given hvac_mode with given temperature (scripts.yaml):
set_climate_custom:
  alias: set_climate_custom
  variables:
    target_entity_id: '{{ entity_id }}'
    desired_temperature: '{{ temperature | default(state_attr(entity_id, ''temperature''))
      }}'
    target_hvac_mode: '{{ hvac_mode | default(''auto'') }}'
  sequence:
  - service: climate.set_hvac_mode
    data:
      hvac_mode: '{{ target_hvac_mode }}'
    target:
      entity_id: '{{ target_entity_id }}'
  - service: climate.set_temperature
    data:
      temperature: '{{ desired_temperature }}'
    target:
      entity_id: '{{ target_entity_id }}'
  description: Nastavení klimatizace na požadovanou teplotu
  fields:
    entity_id:
      description: ID entity klimatizace, které se mají nastavit.
      example: climate.living_room
    temperature:
      description: Teplota, na kterou se má klimatizace nastavit.
      example: '22'
    hvac_mode:
      description: Požadovaný režim HVAC. Pokud není zadán, použije se 'auto'.
      example: auto
  icon: mdi:air-conditioner
This script is perfectly working.
Now I am trying to define conversation and intent_script in configuration.yaml which would trigger this script and simply confirmed it was performed. Something like:
conversation:
  intents:
    SetClimate:
      - "Nastav klimatizaci {name} na {temperature} a režim {hvac_mode}"
  lists:
    hvac_mode:
      values:
        - in: "vypnuto"
          out: "off"
        - in: "auto"
          out: "auto"
        - in: "chlazení"
          out: "cool"
        - in: "topení"
          out: "heat"

intent_script:
  SetClimate:
    speech:
      text: >
       Nastavuji {{ entity_id }} na teplotu {{ temperature }} a režimem HVAC {{ hvac_mode }}.
    action:
      - service: script.set_climate_custom
        data:
          entity_id: "{{ entity_id }}"
          temperature: "{{ temperature }}"
          hvac_mode: "{{ hvac_mode }}"
I know this is wrong configuration.
Is it possible to do it somehow in configuration.yaml? How?
1 post - 1 participant
hello, is there some template for nginx acting as a proxy+letsencrypt?
thanks!
2 posts - 2 participants
Hi, I’m trying to accomplish a lovelace button that when pressed, tells the result of an assist (llm) query
If I call this service:
service: conversation.process
data:
  text: dimmi le previsioni meteo per oggi e la temperatura attuale in balcone
  agent_id: conversation.google_generative_ai_conversation
I get this result:
response:
  speech:
    plain:
      speech: >-
        Il meteo attuale a Roma è nuvoloso. La temperatura attuale in balcone è
        29.6°C.
      extra_data: null
  card: {}
  language: it
  response_type: action_done
  data:
    targets: []
    success: []
    failed: []
conversation_id: 01J0TGBVKVH4MRZJZWVHNJFBD1
I want to pass the “speech” part as a variable and tts that variable on a device:
I did this script:
alias: Meteo OP5T
sequence:
  - service: conversation.process
    metadata: {}
    data:
      text: dimmi le previsioni meteo per oggi e la temperatura attuale in balcone
      agent_id: conversation.google_generative_ai_conversation
    response_variable: risposta
  - service: tts.speak
    metadata: {}
    data:
      cache: true
      media_player_entity_id: media_player.oneplus_5t
      message: "{{ risposta }}"
    target:
      entity_id: tts.piper
description: ""
icon: mdi:weather-lightning
Problem is that the message is the full response and not just the “speech” part. How to filter that? I tried {{ speech.risposta }} but did not work
1 post - 1 participant
Hello everybody!
I’ve been using Home Assistant for a while now with a lot of automation for lights, sunscreens, radio, ect. Really love. I recently discovered the custom button cards. I found some nice examples but, I’m stuck with something. I hope someone can help me.
I found a code for a button card which illuminates the background when switched on. It’s like this:
type: custom:button-card
layout: vertical
icon: mdi:led-strip-variant
show_entity_picture: false
name: Kasten
state:
Works perfectly!
But when I use this to switch on Philips Hue Lights, it switches on to the last scene before switched off. I would like to switch It on on a default scene or default setting. I can do this with a call-service like this:
show_name: true
show_icon: true
type: button
entity: scene.studeerkamer_kasten_ontspannen
name: Studeerkamer kasten
tap_action:
action: call-service
service: light.toggle
target:
entity_id: light.studeerkamer_kasten
data:
rgb_color:
- 255
- 207
- 2
hold_action:
action: toggle
show_state: false
icon: mdi:led-strip-variant
When I combine the two, it switches on like the service does, but the state options used like in the first example, don’t work and don’t do anything.
Is there anybody who can help me with this. I combined it like this, but with now effect:
type: custom:button-card
name: Studeerkamer Kasten
state:
Thank you very much!!
2 posts - 2 participants
Hey Home Assistant Community,
Quick background to what I’m trying to do:
I have a managed network switch that allows SSH connections and provides a limited shell with commands to monitor the device. Unfortunately it is only possible to retrieve some data this way, which is not possible to fetch over SNMP (like PoE power consumption per port, in this case).
So I wrote a bash script to connect to the switch via SSH, run the command to print the data on the switch and parse it to JSON on a 2 second interval.
The script opens the SSH session once, then runs the command on the switch repeatedly without closing the SSH session (I use a expect script to do this). I do it this way instead of re-connecting on every interval, because when connecting to the switch you can notice that it takes 1 to 3 seconds to even authenticate via SSH, so I keep the session open and just run the command repeatedly on the switch once logged in.
This is where we get to the issue: I want to create a command_line sensor from the data retrieved by my script (JSON array with information about each 8 ports). Looking at the documentation for command_line, I see that Home Assistant has it’s own interval to run the script, but this is exactly what I’m trying to avoid. I basically just want to execute my script once which should keep running until HA stops, then “tail” it’s output and load it as sensors for each of the 8 ethernet ports.
How I understand it is, that using command_line it’s not possible to constantly tail the output of a running script and avoid it’s own interval (correct me if I’m wrong, because this would be optimal).
So my other idea would be to create some kind of automation that runs a shell_script on HA startup, then modify my script to output the data to something like /tmp/switch-data.json and using command_line and it’s interval option to just read this file every 2 seconds using HA’s own interval and parse it as sensors.
Am I on the right path? Is there a more optimal solution to this problem?
Thank you in advance!
1 post - 1 participant
I want to use the Emulated Hue option to expose some problematic Wemo devices to Alexa.
Based on reading and watching youtube videos I thought I had everything done correctly. But when I ask Alexa to find devices it comes back with nothing.
I have done a few things in the past that required editing the yaml file so I have used Studio Code Server for a more than a year without issues. And I have installed a number of things in the past.
Perhaps I missed a step and if so you can let me know.
I have my Home Assistant set to a fixed address (I have had that done since day one).
I am using a Home Assistant Green.
emulated_hue:
  host_ip: 10.0.2.250
  listen_port: 80
  expose_by_default: false
  entities:
    switch.hall_bedroom:
      name: "Wemo_Hall_Bedroom"
      hidden: false
    switch.hall_front:
      name: "Wemo_Hall_Front"
      hidden: false
    switch.hall_kitchen:
      name: "Wemo_Hall_Kitchen"
      hidden: false
    switch.porch:
      name: "Wemo_Porch"
      hidden: false
Then i fully rebooted home assistant and when it was fully booted up again I asked Alexa to Discover devices and it found nothing.
I unplugged Alexa for 2-3 min and plunged and tried discovery again no luck.
The next morning i tried discovery again no luck.
I also went to http://10.0.2.250 and get a 404 error so something is listening their. ← just to see if it is running so the 404 says something is their…
I the edited the yaml file and changed the port to 81 and restarted home assistant. And then I was unable to get any connection on http://10.0.2.250 so I know what I was seeing was for sure the Emulated Hue and not some other add-on using that port. (I just wanted to be sure.) I then set the script back to port 80.
For fun I tried again … No change!
I do have a Phillips Hue real device in my house…I am not sure if home assistant is limited to only having one in your house? Or I was wondering if Alexa still look for device on port 80?
I should also add this is a flat network where the same address space used by the wireless and wired network is the same and all the devices including the alexa and home assistant are on 10.0.2.XX.
Finally this is the other device I have on the off chance this information maybe useful.
Also my Home Assistant is fully patched on the latest version of code. (Not beta versions though.)
If anyone knows what my mistake is please let me know.
All the best,
Joe
1 post - 1 participant
Hi there,
I have an issue on by Dashboard tablet where when I click my IP camera icoin to display the stream, the picture is unstable and blinking.
In fact, the stream is displayed, but unstable due to an error message appearing and disappearing several times a second.
Message says “Error with Media stream contents”, as you can see below.
It makes the monitoring impossible ;-(
the dashboard is using the following code :
            entity: camera.192_168_1_5
            tap_action:
              action: call-service
              service: script.launch_cam_rue_tablet_screen_300_dupliquer
              target: {}
              mode: restart
            name: Rue
            primary_info: name
            icon_type: entity-picture
            fill_container: true
            secondary_info: none
          - type: custom:mushroom-entity-card
            card_mod:
              style: |
                ha-card {
                  background: transparent;
                  border: 0px;
                }
… and this script “script.launch_cam_rue_tablet_screen_300_dupliquer” is the following :
alias: Launch cam Rue + tablet screen 300 (Dupliquer)
sequence:
  - service: number.set_value
    data:
      value: "300"
    target:
      entity_id: number.lenovo_tab_m10_plus_3rd_gen_screen_off_timer
    enabled: true
  - service: browser_mod.popup
    data:
      title: Caméra Extérieure
      dismissable: false
      content:
        camera_view: live
        type: picture-glance
        entities: []
        camera_image: camera.192_168_1_5
      timeout: 300000
      size: fullscreen
      browser_id:
        - Lenovo-tablette
      right_button: Fermer
  - delay:
      hours: 0
      minutes: 5
      seconds: 0
      milliseconds: 0
  - service: number.set_value
    data:
      value: "30"
    target:
      entity_id: number.lenovo_tab_m10_plus_3rd_gen_screen_off_timer
    enabled: true
mode: parallel
icon: mdi:cctv
max: 10
(It is just displaying the live strem of my IP camera 192.168.1.5 but change the parameter of the tablet timeout first).
The camera.192.168.1.5 entity is a generic camera and gives the exact same blinking issue when displaying the entity …, here is its configuration :
Any idea how I can display a stable picture of it ?
Many thanks !!!
1 post - 1 participant
I have an existing sensor (from an integration) that provides an (always increasing) energy value (kWh). I’d like to create a new virtual sensor (maybe a template sensor?) that shows how much has been added to this sensor since the start of ‘today’. Logic something like:
Is this possible? Any guidance on how to implement this (specifically the saving the value at 00:00:00 so it can be used later)? Or would a different technique be better?
Any guidance gratefully received as I’m still on a steep learning curve regarding HA.
2 posts - 2 participants
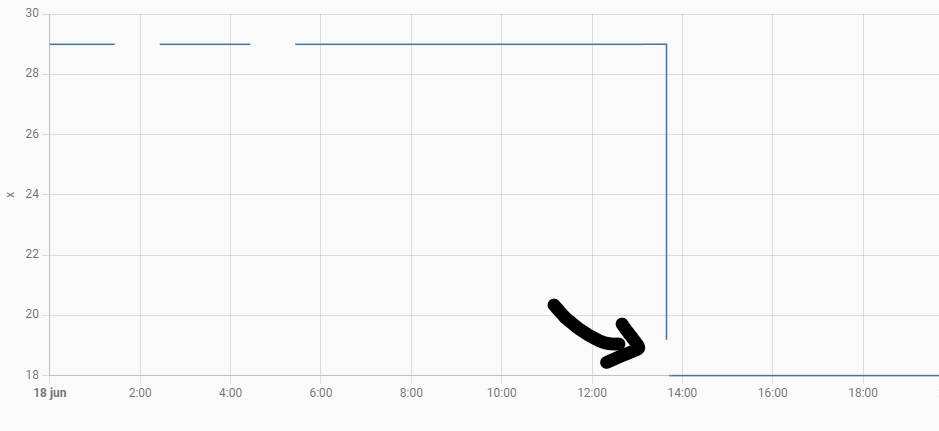
Hi all,
I have the following sensor:
It is a rain sensor and it has the attribute precip. It shows in increments if it is going to rain. I would like a helper with shows True when either the first, second or third value is >0, and off otherwise. How would I achieve this?
Thanks
3 posts - 2 participants
hello ,
i’m struggeling with my configuration.yaml.
I’m trying to add more input_buttons , that invoke a webrequest via de rest_commands.url
i have a working cover , already , but how to add individual inputbuttons to acheave a restcommand ?
thanks in advance
input_button:
  my_button_1:
    name: "qt1"
    icon: mdi:button-1
    service: rest_command.roll_open
  my_button_2:
    name: "qt2"
    icon: mdi:button-2
    service: rest_command.roll_close
MY ERROR IS : Invalid config for 'input_button' at configuration.yaml, line 164: 'service' is an invalid option for 'input_button', check: input_button->my_button_1->service
Invalid config for 'input_button' at configuration.yaml, line 168: 'service' is an invalid option for 'input_button', check: input_button->my_button_2->service
My working cover has this yaml code :
rest_command:
  roll_open:
    url: "http://192.168.2.29/ajax/hello"
  roll_close:
    url: "http://192.168.2.29/ajax/hello2"

# Example configuration.yaml entry
cover:
  - platform: template
    covers:
      garage_door:
        device_class: garage
        friendly_name: "cuetytest"
        open_cover:
          service: rest_command.roll_open
        close_cover:
          service: rest_command.roll_close
        #stop_cover:
          #service: script.stop_garage_door
3 posts - 3 participants
Hi there!
I have 73 Tuya devices currently, all connected through a specific 2.4GHz network used only for IoT. Connection is somewhat stable, but when a power failure occurs (and they happen frequently) one or two devices won’t come back - I have to enter the smart life app and see the ones not connected to reset them.
Well, I would like to automate this task without having for example to define a ping sensor for each one of these devices.
Any suggestions?
Thanks in advance!
1 post - 1 participant